Installing OpenWRT in Linksys 2500v4 E5400 Routers
Table of Contents
Getting Stuff Ready #
First you will need to buy a USB - Serial adapter. I just bought a cheap one in amazon and did the job. Don’t forget also to buy jumper cables and pins.

Once having all the needed material, leave the router’s case by unscreweing the screws behind. The screws are hidden behind a sticker, it took me a while to realise that.
After that, cut four pins and fit them into the holes of the picture:

Looking at the pcb from the top front of the device, the serial port is located on the right-hand side, in the middle of the board.
Then connect only the following:
GNDof the router on theGNDof the USB adapterTXof the router on theRXof the routerRXof the router on theTXof the USB adapter
Now, start a serial session using screen or something similar:
sudo screen /dev/ttyUSB0 115200,cs8,-parenb,-cstopb,-hupcl
Caveats about using the serial TTY #
The quickest way to get the serial console is to cut 5 pins, and make it fit the five holes of the PCB, like in the picture:


There is no need to connect the VCC pin, it is better to power the router though the power supplier port.
Now, it’s ideal to sold the pins into the PCB, but is not necessary. Just by pressing with a finger is enough to have proper serial communication.

And, do not worry. This is safe. The serial port is only used for telling the bootloader to enter in mode “TFTP Recovery”. Transference of the firmware is done via the network.
Installation #
Next step is to verify that we can see the bootloader. Then, we will try to stop the load of the kernel by typing 4.
Now, in order to install OpenWrtm, you need to follow instructions from E5400. Let’s see them step by step:
- 2.A) If windows: Connect the serial port to windows though PuTTY ([link] (https://www.putty.org))
Select Serial Communication, the COM port, check at device administrator. And the bound rate. In our case it was as in the picture.
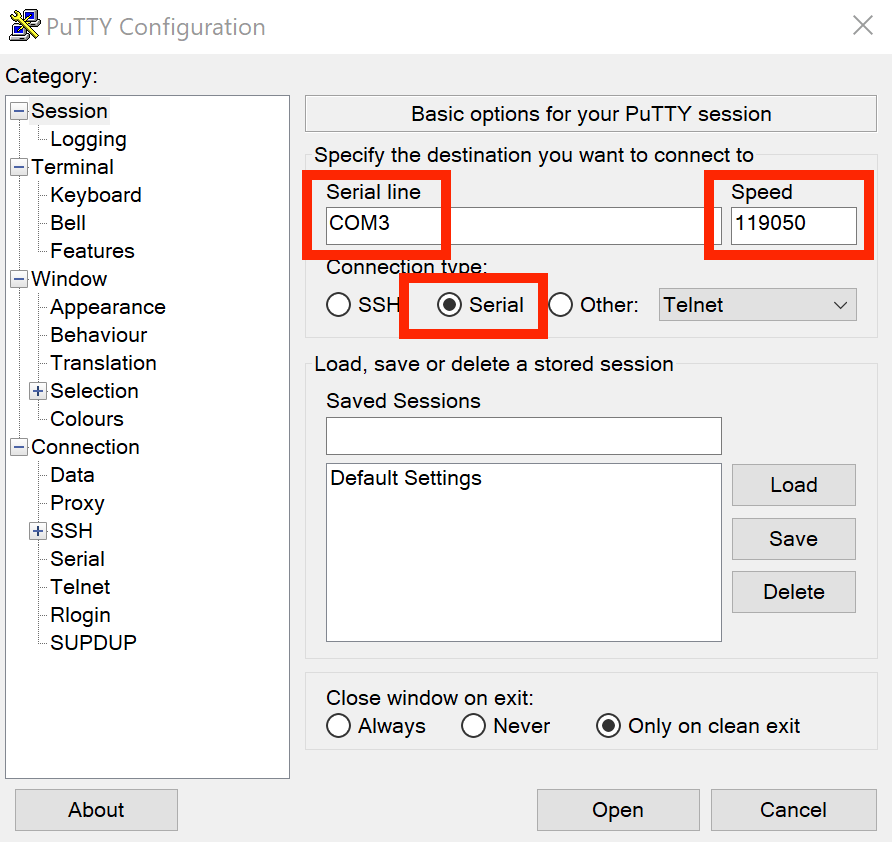
As is specified in (link) in the serial section, the real value of the baud rate is close to 119050.
- 2.B) If Linux:
Connect to UART, use LF as EOL (not (CRLF)*
With thescreencommand of the above, that shouldn’t be an issue.
- Set an IP address
In this step, you will configure in the U-Boot the IP address of the TFTP client (the router) and the server (your computer). The client will ask fot a bootable file and the server will provide that file to the router (openwrt-ramips…intramfs-kernel.bin)([link] (https://openwrt.org/toh/linksys/e5400)). You may also download the (openwrt-ramios…sysupgrade.bin) file that will be used in point 4. However, before making that changes, maybe it make sense to run theprintenvcommand and check which defaut values are already configured. In this documentation I’ll change the addresses to make it more complete.
2.1. Press 4 During Boot
Right after the router starts bouting, immediately press 4 key for stopping the proces. U-Boot will cancel the load of the OS and it will show a “prompt” indicating that you can interact with the router.
2.2. Set server TFTP IP
Run the following command:
setenv serverip 192.168.1.2
2.3. Set client IP
Run the following command:
setenv ipaddr 192.168.1.1
2.4. Indicate the name of the bootable file
Run the following command:
setenv bootfile owrt.bin
With that we specify the name of the file that the TFTP client (the router) will ask the TFTP server of your computer. Whatever name is valid, just make sure that the name here matches the name in the file of the TFTP server.
2.5. Save configuration
Run the following command:
saveenv
2.6. Reboot the router
Run the following command to start the reboot:
reset
- Load OpenWrt kernel image from TFTP.
In this step is assumed that a TFTP server is running in your computer, listening to theserveripaddress you previously set, and serving theowrt.binfile that you have defined with thebootfileparameter.
3.A) To have a TFTP server up and running, see this tutorial about [setting a TFTP server with Linux][link (https://www.makeuseof.com/set-up-tftp-server-on-linux/)).
Installation of TFTP server
sudo apt-get install tftpd-hpa
After installation, the TFTP service will start listening on the UDP port 69. To serve the files to other systems via the TFTP server, you need to keep in mind a few prerequisites:
- Make sure that the files you want to serve are copied to the TFTP home directory or a directory below that home directory.
- Making file permissions visible to the public.
To find or change the directory of the TFTP server home directory you can look at the TFTP_DIRECTORY variable when you run the command:
cat /etc/default/tftpd-hpa
3.1. Press 1 key during boot.
- That will interrupt the startup process of U-Boot and start the TFTP client from the router.
- Now, router will ask for temporal IP addresses, but you should have already configured them via serial before. So you just need to press enter.
- Boot into OpenWrt and perform sysupgrade with sysupgrade image. Indicated on point 2
If everything went fine, the TFTP client from the router will obtain the file from the TFTP of your computer, will copy it into his RAM memory and will start the OS from there.
Important: Until that point all the operations are not destructive. If the router reboots or anything happens, you will still having the original firmware
If OpenWrt started fine, you should be able to log in via ssh:
ssh 192.168.1.1 # No password is needed
At that point, you can overwrite factory firmware and install definetelly OpenWrt using the sysupgrade tool. What we loaded was the initramfs firmware version. This version provides the Linux kernel and a bare-minimum OS (e.g., without web interface) that is loaded into the RAM memory, without write into flash memory. Be sure that you have used this image, and not others, in order to load it via TFTP. If you load other images, U-Boot will not be able to load them. The initramfs images can be downloaded from ([link] (https://openwrt.org/toh/linksys/e5400)) the file (openwrt-ramios…sysupgrade.bin), mentioned in point 2.
Now, from the TFTP server machine run:
scp sysupgrade.bin [email protected]:/root
That will copy the image that will install the OS definetelly. Finally, to install OpenWrt run:
sysupgrade -n -v /root/sysupgrade.bin
After Installation #
Installing LuCI (GUI) #
Since this is a snapshot version, the graphical interface does not come installed by default. To do so, follow this simple tutorial to have it running.
Connected to the router with ethernet, log in into OpenWrt via the terminal. Once inside, run the following commands:
- Install the required packages.
opkg update
opkg install luci
- Install the required packages to provide encryption.
opkg update
opkg install luci-ssl
/etc/init.d/uhttpd restart
Open your usual explorer and you will be able to login into the router via the Luci interface. Once you put the password, the interface will look like this:
